Register integration
Make sure to peruse our Glossary before you start building your first integration.
Before accessing Pio customer user data a integration developer should make sure that a organization is setup with a
AutoStore grid.
If you have received credentials to the Pio App it's safe to assume this is done, otherwise please contact
Pio API Support (support@pio.com). If your integration requires callback updates from Pio
API make sure to have callback_url setup to return 200.
To get started with building your own integration you'll need to generate client credentials and API token. We'll discuss more about adding integration in next section. At the moment you can use Pio API to add/update products, orders and receive updates inventory changes for a product and fulfillment status for a order. Some of these updates can be received using REST hooks for events API supports.
Integration architecture
Before you start creating your integration you should have made a decision if this is something you will use for a single customer or if this is something that will be used across multiple customers.
With an integration to Pio you can create one integration that can handle multiple customers and in turn, multiple shops. This gives you several possibilities when it comes to how you want to use your integration.
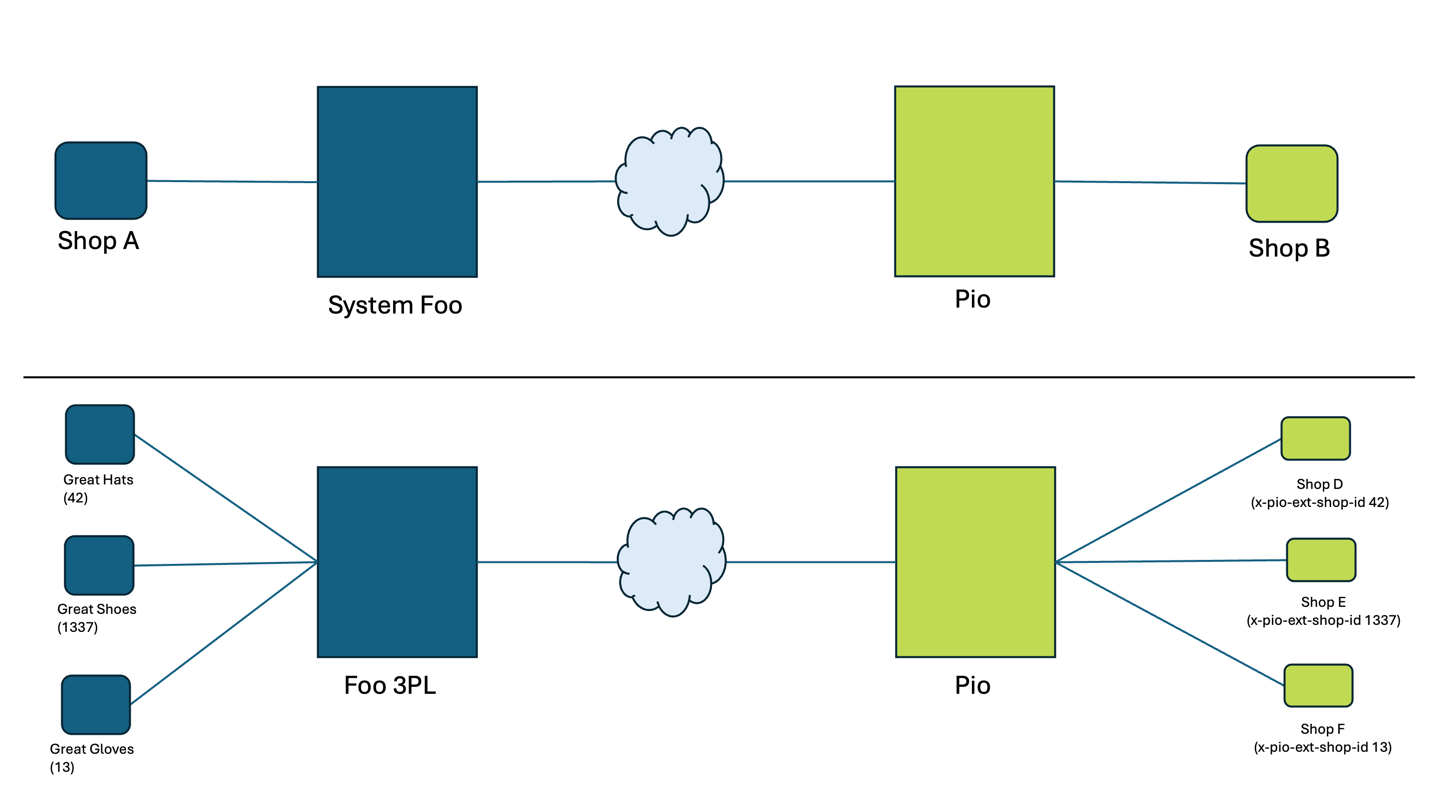
In the most simple case, you can create an integration that handles order from one store and sends these over to Pio.
But let's say we have a imaginary 3PL called Foo 3PL. Foo 3PL has three customers, Great Hats, Great Shoes and Great gloves. All three use Foo 3PL to fulfil their orders. Now that Foo 3PL are going to use Pio they need to create an integration while still being able to serve their three different customers.
This is fully supported and easily achievable in Pio. Firstly, Foo 3PL needs to add a new integration to Pio. This will be
the common link between Foo 3PL and pio. Foo 3PLs integration can than create three new shops in Pio, each
receiving their own access token. Once all of this is in place Foo 3PL can create orders and products for each shop by
using their respective access token when doing so. On receiving webhook messages from Pio, each message can be correlated
to which shop it belongs to by the x-pio-ext-shop-id header on the request.

So looking at the example above. When Foo 3PLs integration want to create a shop in Pio for the customers Great Hats store
that has some imaginay id 42, they will create it by setting the ext_shop_id to 42. In future webhook messages from Pio
the x-pio-ext-shop-id will be set to 42 for messages that are releated to the Great Hats store.
Registering integration with Pio API
- You can register your new integration with
name(integration name),email(developer email) and validcallback_url.
Note that callback_url is the url where API will redirect the user back to after authorization.
- On registering your integration, you will a get
client_idandclient_secret. Save these details/secrets somewhere safe, since these will be used to identify your integration with the Pio API.
To get the access_code needed to make requests to the Pio Integration API, use the client_id and client_secret in the
next section and follow those steps.
- Pio API allows deactivating (
DELETE) integration andGETintegration details using credentials obtained from above.